M5Stack M5StickC PLUS
Product Images
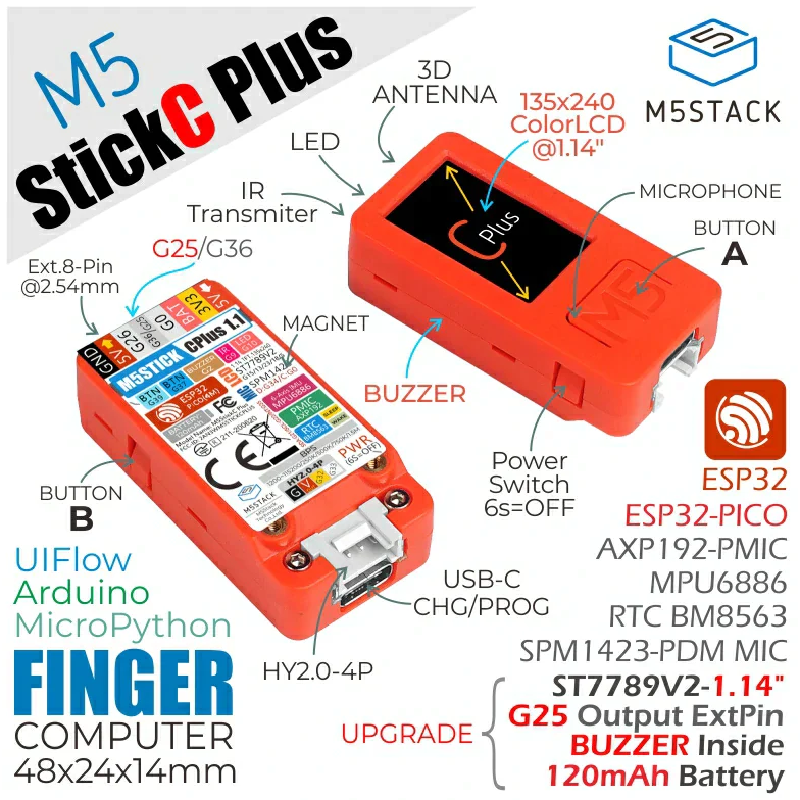
GPIO Pinout
| Pin | Function |
|---|---|
| GPIO37 | Button A |
| GPIO39 | Button B |
| GPIO10 | Internal LED |
| GPIO09 | Infrared LED |
| GPIO13 | SPI CLK |
| GPIO15 | SPI MOSI |
| GPIO21 | I2C SDA |
| GPIO22 | I2C SCL |
| GPIO05 | Display CS |
| GPIO23 | Display DC |
| GPIO19 | Display Reset |
| GPIO00 | I2S CLK |
| GPIO26 | I2S LRCLK |
| GPIO35 | Microphone Data |
External Component
ESPHome AXP192 Component by martydingo This custom component it to implement support for the AXP192 for both the M5Stick-C. It is required to turn on the backlight.
Example Configuration
substitutions:
  devicename: m5stick
  upper_devicename: M5StickC
esphome:
  name: $devicename
  platformio_options:
    upload_speed: 115200
esp32:
  board: m5stick-c
wifi:
  ssid: !secret wifi_ssid
  password: !secret wifi_password

  ap:
    ssid: $devicename Fallback Hotspot
    password: !secret wifi_password
captive_portal:
logger:
api:
ota:
external_components:
  - source: github://martydingo/esphome-axp192
    components: [axp192]
# AXP192 power management - must be present to initialize TFT power on
sensor:
  - platform: axp192
    address: 0x34
    i2c_id: bus_a
    update_interval: 30s
    battery_level:
      name: "M5Stick Battery Level"
      id: "m5stick_batterylevel"
binary_sensor:
  - platform: gpio
    pin:
      number: GPIO37
      inverted: true
    name: ${upper_devicename} Button A
    on_press:
      then:
        - light.turn_on: led1
    on_release:
      then:
        - light.turn_off: led1
  - platform: gpio
    pin:
      number: GPIO39
      inverted: true
    name: ${upper_devicename} Button B
    on_press:
      then:
        - light.turn_on: led1
    on_release:
      then:
        - light.turn_off: led1
light:
  - platform: monochromatic
    output:  builtin_led
    name: ${upper_devicename} Led
    id: led1
output:
  - platform: ledc
    pin: 10
    inverted: true
    id: builtin_led
remote_transmitter:
  - pin:
      number: GPIO9
    carrier_duty_percent: 50%
    id: internal
spi:
  clk_pin: GPIO13
  mosi_pin: GPIO15
i2c:
   - id: bus_a
     sda: GPIO21
     scl: GPIO22
     scan: True
font:
  - file: "gfonts://Roboto"
    id: roboto
    size: 12
# 1.14 inch, 135*240 Colorful TFT LCD, ST7789v2
display:
  - platform:  st7789v
    model: TTGO TDisplay 135x240
    cs_pin: GPIO5
    dc_pin: GPIO23
    reset_pin: GPIO18
    rotation: 270
    lambda: |-
      it.print(80, 0, id(roboto), ST77XX_WHITE, TextAlign::TOP_CENTER, "M5Stick Test");
i2s_audio:
  id: bus_i2s
  i2s_lrclk_pin: G26
  i2s_bclk_pin: G0
microphone:
  - platform: i2s_audio
    i2s_din_pin: GPIO34
    i2s_audio_id: bus_i2s
    adc_type: external
    pdm: true
    id: mic
Workaround for using devices powered with 5V on the HY2.0-4P port
The 5V power on the HY2.0-4P is fed by the axp192. Therefore these devices must be initialized some time after the axp192 has started.
i2c:
   - id: bus_grove
     sda: GPIO32
     scl: GPIO33
     scan: True
     frequency: 100kHz

## Start after the axp192 has powered up

## In case an additional delay is needed this component may be helpful:

## https://github.com/ssieb/esphome_components/tree/master/components/boot_delay

setup_priority: 500
sensor:

## Example: anything connected to "i2c_id: bus_grove" should have a lower setup priority than bus_grove.

- platform: scd30
    setup_priority: 490
    i2c_id: bus_grove
    address: 0x61
    co2:
      name: "CO2"
    temperature:
      name: "Temperature"
    humidity:
      name: "Humidity"