Shelly Plug S Gen3


Overview
Generation 3 of Shelly Plug-S
At this moment there is NO way to Flash it OTA. You need to open the Plug and use UART!
As always, first take a dump!
esptool -b 115200 --port COM11 read_flash 0x00000 0x800000 shelly_plug_s_gen3.bin
UART Pinout
| Pin | Colour |
|---|---|
| Reset | Brown |
| 3v3 | Red |
| RX | Blue |
| TX | Yellow |
| BootSEL | Purple |
| GND | Black |
GPIO Pinout
| Pin | Function |
|---|---|
| GPIO3 | Internal Temperature |
| GPIO4 | LED WS2812 |
| GPIO5 | Relay |
| GPIO6 | BL0942 TX |
| GPIO7 | BL0942 RX |
| GPIO18 | Button |
substitutions:
  device_name: shelly-plug-s-gen3
  friendly_name: "Shelly Plug S Gen3"
  ip_addr: 10.0.x.x
  update_bl0942: 5s
esphome:
  name: ${device_name}
  friendly_name: ${friendly_name}
  comment: "Free Shelly!"
  platformio_options:
    board_build.flash_mode: dio
esp32:
  board: esp32-c3-devkitm-1
  flash_size: 8MB
  framework:
    type: esp-idf
    version: recommended
    sdkconfig_options:
      COMPILER_OPTIMIZATION_SIZE: y
wifi:
  ssid: !secret wifi_ssid
  password: !secret wifi_password
  ap:
    ssid: "FreeShelly Hotspot"
    password: !secret wifi_password
logger:
api:
  encryption:
    key: !secret api_encryption_key
ota:
  - platform: esphome
    password: !secret ota_password
captive_portal:
binary_sensor:
  - platform: gpio
    id: "push_button"
    name: "Button"
    internal: true
    pin:
      number: GPIO18
      inverted: yes
      mode:
        input: true
        pullup: true
    filters:
      - delayed_on_off: 5ms
switch:
  - platform: gpio
    pin: GPIO4
    name: "Relay"
light:
  - platform: esp32_rmt_led_strip
    rgb_order: GRB
    rmt_channel: 0
    chipset:
    pin: GPIO4
    num_leds: 4
    id: rgb_light1
    internal: false
    default_transition_length: 700ms
    restore_mode: ALWAYS_OFF
uart:
  id: uart_0
  tx_pin: GPIO7
  rx_pin: GPIO6
  baud_rate: 9600
  stop_bits: 1
  data_bits: 8
  parity: NONE
sensor:
  - platform: ntc
    sensor: temp_resistance_reading
    name: "Temperature"
    unit_of_measurement: "°C"
    accuracy_decimals: 1
    icon: "mdi:thermometer"
    calibration:
      b_constant: 3350
      reference_resistance: 10kOhm
      reference_temperature: 298.15K
  - platform: resistance
    id: temp_resistance_reading
    sensor: temp_analog_reading
    configuration: DOWNSTREAM
    resistor: 10kOhm
  - platform: adc
    id: temp_analog_reading
    pin: GPIO3
    attenuation: 12db
  - platform: bl0942
    uart_id: uart_0
    address: 0
    voltage:
      name: 'Voltage'
      id: bvoltage
      icon: mdi:alpha-v-circle-outline
      device_class: voltage
    current:
      name: 'Current'
      id: bcurrent
      icon: mdi:alpha-a-circle-outline
      device_class: current
    power:
      name: 'Power'
      id: bpower
      icon: mdi:transmission-tower
      device_class: power
    energy:
      name: 'Energy'
      id: benergy
      icon: mdi:lightning-bolt
      device_class: energy
    frequency:
      name: "Frequency"
      id: bfreq
      accuracy_decimals: 2
      icon: mdi:cosine-wave
      device_class: frequency
    update_interval: ${update_bl0942}
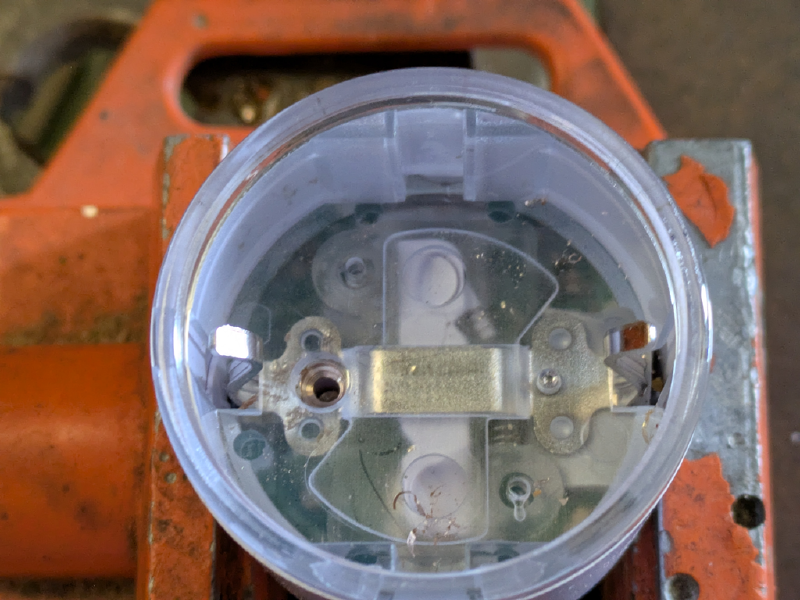
Open the device
This little seal need to drill open, best you use a prick punch with an M3.5-M4 Drill.
 When the seal is cracked open, you need a M2 drill, and drill in center, just a little.
 Now take a tapered punch and press the seal out. The whole grounding receptacle will come out.
We need some hot-air (~300°C) and 5 of the iFixit triangle-plastic, there are 3 spots with glue.
Heat them up, and try placeing the plastic around.
Now take a tapered punch and press the seal out. The whole grounding receptacle will come out.
We need some hot-air (~300°C) and 5 of the iFixit triangle-plastic, there are 3 spots with glue.
Heat them up, and try placeing the plastic around.
 You will get a little gap, take anohter plastic and g et betweet the withe and transparent plastic, and make a circle.
After 2 rounds you can easly take it out.